Tuesday, December 3, 2019

25+ Ways to Use Google Keep

25+ Ways to Use Google Keep for Teachers and Students
Google Keep is an online web tool for creating and saving notes, lists, reminders, and more. Think of Google Keep like an online sticky note board, with digital versions of your sticky notes. You can add images, text, drawings, voice notes, and more. This robust tool is underutilized! You and your students can use Google Keep to take notes, manage projects, set goals, communicate, and collaborate in your classroom.

Google Keep Basics

Create a Note
25+ Ways to Use Google Keep
Note Options
  • Reminders: Create a reminder by date and time or a location-based reminder.
  • Add Collaborators: Share your notes and lists with other individuals or groups.
  • Change the Note Color: Choose from a palette of other colors to brighten things up or color-code your notes.
  • Add an Image: Add a picture (or snap a photo on mobile) to your notes.

Personalize Google Keep for You and Your Students

Adding custom images to create visually driven notes can be a great use for teachers and students.
To learn more about this strategy, check out my previous post: Personalize Google Keep for You and Your Students.
25+ Ways to Use Google Keep

Add a Drawing to Your Notes

To Add a Drawing: Go to the 3 dots on your note, and select “add drawing.”
This allows you to sketch using the drawing tools (pen, marker, or highlighter) and add them to a note. 
Choose from different sizes and colors and add your drawing to a note or an image. 
You can even annotate on top of an image.
25+ Ways to Use Google Keep

Use the Drawing Tool for Annotation & Labeling

  1. Add the image to Keep
  2. If you want to use an article or paragraph, take a screenshot and upload it.
  3. Click or tap on the image to get the drawing tools.
  4. Draw, label, or annotate.
  5. Be sure to click DONE to save the changes.
  6. If you want this shared, they can add you as a collaborator, right-click and copy the image, or convert to Google Docs.
25+ Ways to Use Google Keep

AutoDraw App Smash

AutoDraw is a great way to use the stylus and/or tablet to draw or take notes that can then easily be saved to Google Keep.

Autodraw

Keep Integration with Other G Suite Apps

Inside your favorite Google app, go to the sidebar and click on the Keep icon.
25+ Ways to Use Google KeepSave Text or Images as a Note
  1. Open a Google Doc or Slide.
  2. Highlight and right-click the text or image you want to save as a note.
  3. From the menu that appears, select Save to Keep notepad.
Add a Note to a Doc or Slide
  1. Open a Google Doc or Slide.
  2. Click on the Keep icon in the sidebar.
  3. In the side panel, locate the note you want to add to the file.
  4. Click and drag the note into your document.

Google Docs Integration

Click-and-drag from the Google Keep sidebar to add notes and images to your document.
25+ Ways to Use Google Keep

Google Slides Integration

Outline your presentation in Google Keep, then click and drag to add content.
Note: this works best with a blank slide!
25+ Ways to Use Google Keep

Google Keep for Feedback & Assessment

Google Keep makes the perfect companion for teachers giving feedback and assessing student work.
4 of my favorite ways to use Google Keep for feedback:
  1. Badges
  2. Comment bank
  3. Bitmoji stickers (get the Bitmoji extension)
  4. GIFs!
25+ Ways to Use Google Keep
See my previous blog post for all the details: 4 Ways to Use Google Keep for
Feedback & Assessment.
Check out this idea for Docs Stickers from Stephanie Filardo

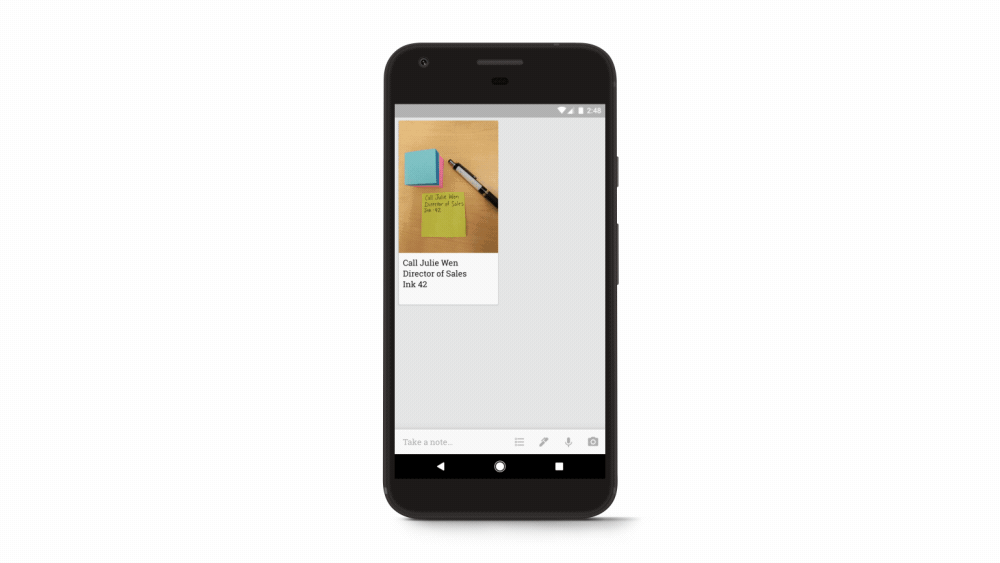
Convert Paper Notes to Digital!

Using the mobile app or a webcam:
    • Snap a photo of your paper notes, sticky notes, meeting notes, sketches, etc.
    • Students can snap a photo of notes, problem solve, hand draw sketches, etc.
    • Any text found in the image is searchable in Google Keep.
    • BONUS: Grab image text, and the text is added to the note!
25+ Ways to Use Google Keep

Voice Notes (Mobile Only)

  • Tap the microphone at the bottom of the screen near, “Take a note…”
  • Dictate your note into the app.
  • BONUS: Speech is translated into text and added to your note!

15 Ways for Students to Use Google Keep

There are so many ways for secondary students to use Google Keep! Check out my previous blog post and infographic for details.
15 Ways for Students to Use Google Keep

Google Keep for Student Goal Setting

25+ Ways to Use Google Keep
  • Goal setting is one important way to empower student learners; in fact, it’s in the ISTE standards!
  • Help students set meaningful learning goals for your classroom, AND
  • Help students set THEIR OWN, personal learning goals!
  • Start simple: Ask students, What are three things that would make today great.
  • Try to keep them from being “grade,” focused

Reflection/Journaling

Google Keep works great for reflections and journaling:
  • Teachers reflect on the lesson and assessment.
  • Students reflect on their own learning and progress.
  • Quick journals and longer journal assignments work great in Keep.
        • If the note gets too long, convert to a Google Doc.

Get the Google Keep Chrome Extension

  • Perfect for bookmarking
  • Read later lists
  • Research
  • Curation

Curation with the Keep Chrome Extension

Curation is an important 21st Century skill for students and teachers, and the Keep Chrome extension makes this easy peasy, lemon squeezy!
25+ Ways to Use Google Keep

Use Labels to “Keep” Keep Organized

25+ Ways to Use Google Keep
What do you think? What are your favorite Google Keep features?
Please share in the comments below.

© Shake Up Learning 2019. Unauthorized use and/or duplication of this material without express and written permission from this blog’s author and/or owner is strictly prohibited. Excerpts and links may be used, provided that full and clear credit is given to Kasey Bell and Shake Up Learning with appropriate and specific direction to the original content on ShakeUpLearning.com. See: Copyright Policy.

Wednesday, November 20, 2019

Old or New, Maps are Cool

Old or New, Maps are Cool

By Christine WeiserNovember 18, 2019

Selection of old maps
(Image credit: Glenn Wiebe)
Can you ever have too many maps?
The obvious answer is no. You can never have too many maps.
So when I ran across some very cool old maps last Saturday at the Wichita Flea Market, there really wasn’t any question about whether or not I would buy them. The question was how many will I buy.
I settled on two. Which means my wife helped me decide that I should settle on two. There are quite a few maps already in my house and I was gently made aware of that fact. Which means semi-gently.
Both of the maps I walked away with are almost 100 years old. One is a 1924 map of tourist Rome published in Italian, the other a map highlighting the 1924 British Empire Exhibition with suggested mass transit options from around the London metro area. So cool.
Perfect for displaying, reading, primary source analysis, (the Empire Exhibition and its various colonial pavilions is just asking for some in-depth conversation) or just wafting in the 100 year old smell.
But while we all can agree how cool old maps are, new maps are nothing to sneeze at. I love the ability of digitized maps to allow access to all sorts of data in all sorts of very visual ways. Take a look at these two new atlases from the Digital Scholarship Lab at the University of Richmond.
The first collection of digital maps, the Atlas of the Historical Geography of the United States, is based on an atlas that was original created in 1932 by Charles O. Paullin and John K. Wright. Many of those beautiful maps have been enhanced:
. . . in ways impossible in print, animated to show change over time or made clickable to view the underlying data – remarkable maps produced eight decades ago with the functionality of the twenty-first century.
Presidential election of 1892 map of voting results
(Image credit: Glenn Wiebe)
Like the original, there are 14 different chapters and almost 700 maps. All based on older maps but digitized and edited to make them more accessible and richer in content. And like the original, the atlas addresses a broad range of issues.
Beginning with a chapter consisting of 33 maps on the natural environment and a second containing 47 maps documenting the evolution of European and later American cartographic knowledge about North America, the atlas mapped an exhaustive number of historical topics: exploration and settlement of the continent, the location of colleges and churchesdisputes over international and state boundaries, voting in presidential elections and in Congress, reforms from women’s suffrage to workmen’s compensationtransportationindustriesagriculturecommercethe distribution of wealth, and military history.
For twenty-first-century audiences, it’s probably no surprise that it’s missing a few things as an historical atlas. Besides the fact that it’s now more than eighty years out of date, it is primarily focused on Americans of European descent – though, to be fair, it certainly contains a significant number of maps showing the geographic distribution of people of different ethnic and racial backgrounds. Yet whatever the atlas’s shortcomings, browsing through its many thoughtful and often beautiful maps one can’t help but be impressed. Anyone interested in American history before 1930 is almost certain to find many maps in the atlas that are both interesting and useful.
So if you’re teaching any US history, the newly updated digital version is a no-brainer. Head to the About page to jump start your time in the Altas.
But wait. There’s more the people at Digital Scholarship Lab weren’t finished. They’ve also created American Panorama, an historical atlas of the United States for the twenty-first century. “It combines cutting-edge research with innovative interactive mapping techniques, designed to appeal to anyone with an interest in American history or a love of maps.”
So . . . I’m listening.
It’s a smaller collection of just eight maps so far but the maps move closer to the present, with one map focusing on electing the House of Representatives from 1840 – 2016 and another on America’s foreign-born population up to 2010, for example.
But all of the maps give you tools to help kids actually see history and begin to make sense of events in ways that simple text cannot. The Mapping Inequality map that highlights the redlining of home loans by the Home Owners Loan Corporation during the 1930s and 40s is a powerful way to jumpstart and deepen a conversation around civil rights and racism in the US.
Mapping Inequality map, highlighting redlining of home loans by the Home Owners Loan Corporation during the 1930s and 40s
(Image credit: Glenn Wiebe)
Used together, these two updated versions of cool old maps like the ones I uncovered at the flea market give you powerful tools to hang on your teaching tool belt.
(And don’t forget to use the Library of Congress and National Archives map analysis worksheets to help kids unpack all the goodness.)
cross posted at glennwiebe.org
Glenn Wiebe is an education and technology consultant with 15 years' experience teaching history and social studies. He is a curriculum consultant for ESSDACK, an educational service center in Hutchinson, Kansas, blogs frequently at History Tech and maintains Social Studies Central, a repository of resources targeted at K-12 educators. Visit glennwiebe.org to learn more about his speaking and presentation on education technology, innovative instruction and social studies.

Monday, November 11, 2019

Practice Feedback on PPT

www.freetech4teachers.com /2019/11/get-instant-feedback-on-your.html

Get Instant Feedback on Your Presentations With Presenter Coach

1-1 minutes


Presenter Coach is one of best features to be added to PowerPoint in a long time. Presenter Coach is found in the online version of PowerPoint that anyone can use with a free Microsoft account. Presenter Coach will give you feedback on the pacing of your presentations, your use of filler words, and your use of sensitive phrases. In the following video I demonstrate how to use Presenter Coach in PowerPoint.
Applications for Education
Presenter Coach has the potential to be a great tool for students to use a few times before presenting in front of their classmates. Even students who don't normally get nervous about giving presentations or think that they're good at giving presentations may be surprised at how many filler words they use or how quickly they speak.

Special Note for Google Slides Users
You might be reading this and thinking, "that's great, Richard, but my students have Chromebooks." My students have Chromebooks too. That doesn't mean they can't use Presenter Coach. It just means that they have to download their presentations from Google Slides as PPTX files and then upload them to the online version of PowerPoint. I outlined that process in this video.

Monday, October 28, 2019

Spice up Slides with New Templates

Spice up Slides with New Templates


Spice Up Your Slides with 600+ Free Design Templates

Screenshot of
(Image credit: Eric Curts)
Google Slides is an excellent tool not just for creating presentations, but for making eBooks, stop-motion animation, Choose Your Own Adventure stories, comic strips, and much more. However, one aspect that is a little lacking in Slides is the amount of design themes available by default.

When you create a Google slideshow you are given a simple list of 23 basic design themes to choose from. These control the colorsfont choice, and overall style of the presentation. Although these are a great place to start, and work well for most presentations, what if you want a different look and feel? Certainly you can manually change the font face, font colors, background color or image, and more.

However as educators, the one thing we have less of than default design themes is time. Thankfully there are many websites that have created and shared hundreds of templates that can be used for your new Google Slides presentations.

In this blog post we will look at a wide range of online resources that provide over 600 design theme templates (as of last count) for you and your students to use in your creations. In most cases you will simply need to click on the templates provided and then make a copy for your own use. Once you have your copy, you can edit the slideshow however you want and add your own content.

1) Slides Carnival

https://www.slidescarnival.com/
Over 130 design theme templates. Each template has 25+ slides with a variety of layouts and designs.
Screenshot of Slide Carnival
(Image credit: Eric Curts)

2) Slides Mania

https://slidesmania.com/
134 design theme templates. Each template has a wide variety of layouts and designs. Many of the templates are for general use, but there are also a large amount of specialty templates including graphics organizers, manipulatives, school planner, back-to-school, school rewards, and more.
Screenshot of Slides Mania
(Image credit: Eric Curts)

3) Google Slides PPT

http://googleslidesppt.com/
36 design theme templates. Each template has 30+ slides with a variety of layouts and designs.
Screenshot of Google Slides
(Image credit: Eric Curts)

4) Slides Go

https://slidesgo.com
145 design theme templates, including an entire category dedicated to education themes. Each template has multiple slides with a variety of layouts and designs.
Screenshot of Slides Go
(Image credit: Eric Curts)

5) Free Google Slides Templates

https://freegoogleslidestemplates.com/free-templates/
17 design theme templates. Each template has multiple slides with a variety of layouts and designs.
Screenshot of Free Google Slides Templates
(Image credit: Eric Curts)

6) Slide Model

https://slidemodel.com/google-slides/
240 design theme templates. Many of these templates have fewer slides than some of the other sites, but with a wide variety there are many to choose from.
Screenshot of Slide Model
(Image credit: Eric Curts)

7) Mike MacFadden Templates

http://www.mmacfadden.com/templates/
21 design theme templates. These templates differ from the earlier examples because the layouts are saved in the slide master. After you make a copy of one of the templates, click the down arrow next to the "+" button (new slide button) to see and choose the layout you wish to insert.
Mike MacFadden Templates screenshot
(Image credit: Eric Curts)
https://docs.google.com/presentation/u/0/?ftv=1&tgif=c
26 design theme templates. In addition to the default themes that show up when you first create a slideshow, Google actually provides another 26 options in their template gallery. You can access these resources using the link above, or by going to Drive then clicking "New" then hovering over "Google Slides" and choosing "From a template".

These templates include examples such as Book Report, Flash Cards, Science Project, Photo Album, Portfolio, and more.
Advertisement
Screenshot of Google's Template Gallery
(Image credit: Eric Curts)
cross posted at www.controlaltachieve.com
Eric Curts is an education trainer and consultant with over 20 years' experience throughout the U.S. He is an authorized Google Education Trainer and a Google Certified Innovator. Read his blog at www.controlaltachieve.com and follow him on Google+ and @ericcurts on Twitter.

Wednesday, September 18, 2019

All the Best Google Sheets Keyboard Shortcuts


www.howtogeek.com

All the Best Google Sheets Keyboard Shortcuts

9-11 minutes


The Google Sheets logo.
No one likes to do things the hard way, which is why we have keyboard shortcuts! We’re going to look at the shortcuts you can use in Google Sheets to save yourself some time.
By no means is this a complete list of all keyboard shortcuts available in Google Sheets. We’ve limited our list to those that are more generally useful. There are plenty more you can explore if you can’t find what you’re looking for in this guide.
To open a list of keyboard shortcuts in Google Sheets, press Ctrl + / (Windows and Chrome OS), Cmd + / (macOS) If you want to see the complete list, check out the Google Sheets support page.

General Program Actions

These keyboard shortcuts make it easier to perform common actions, like copying cells or selecting rows or columns:
  • Ctrl+C (Windows/Chrome OS) or Cmd+C (macOS): Copy the selected cells to the Clipboard.
  • Ctrl+X (Windows/Chrome OS) or Cmd+X (macOS): Cut the selected cells to the Clipboard.
  • Ctrl+V (Windows/Chrome OS) or Cmd+V (macOS): Paste the contents of the Clipboard to the sheet.
  • Ctrl+Shift+V (Windows/Chrome OS) or Cmd+Shift+V (macOS): Paste only the values of the Clipboard.
  • Ctrl+Space (Windows/Chrome OS) or Cmd+Space (macOS): Select the whole column.
  • Shift+Space (Windows/Chrome OS) or Shift+Space (macOS): Select the whole row.
  • Ctrl+A (Windows/Chrome OS) or Cmd+A (macOS): Select all of the cells.
  • Ctrl+Z (Windows/Chrome OS) or Cmd+Z (macOS): Undo an action.
  • Ctrl+Y (Windows/Chrome OS) or Cmd+Y (macOS): Redo an action.
  • Ctrl+F (Windows/Chrome OS) or Cmd+F (macOS): Find in the sheet.
  • Ctrl+H (Windows/Chrome OS) or Cmd+H (macOS): Find and replace in the sheet.
  • Shift+F11 (Windows Only): Insert a new sheet.
  • Ctrl+Alt+Shift+H (Windows/Chrome OS) or Cmd+Option+Shift+H (macOS): Open the spreadsheet’s revision history.

Format Cells

Google Sheets has heaps of shortcuts you can use to format cells. These are the shortcuts you use to do things like italicize or bold text, or format cell data to exponents:
  • Ctrl+B (Windows/Chrome OS) or Cmd+B (macOS): Bold.
  • Ctrl+I (Windows/Chrome OS) or Cmd+I (macOS): Italicize.
  • Ctrl+U (Windows/Chrome OS) or Cmd+U (macOS): Underline.
  • Ctrl+Shift+E (Windows/Chrome OS) or Cmd+Shift+E (macOS): Center align a cell.
  • Ctrl+Shift+L (Windows/Chrome OS) or Cmd+Shift+L (macOS): Left align a cell
  • Ctrl+Shift+R (Windows/Chrome OS) or Cmd+Shift+R (macOS): Right align a cell.
  • Ctrl+; (Windows/Chrome OS) or Cmd+; (macOS): Insert the current date.
  • Alt+Shift+7 (Windows/Chrome OS) or Cmd+Shift+7 (macOS): Apply an outer border to the selected cells.
  • Alt+Shift+6 (Windows/Chrome OS) or Option+Shift+6 (macOS): Remove a border from the selected cells.
  • Ctrl+Shift+1 (Windows/Chrome OS/macOS): Format as a decimal.
  • Ctrl+Shift+2 (Windows/Chrome OS/macOS): Format as time.
  • Ctrl+Shift+3 (Windows/Chrome OS/macOS): Format as a date.
  • Ctrl+Shift+4 (Windows/Chrome OS/macOS): Format as currency.
  • Ctrl+Shift+5 (Windows/Chrome OS/macOS): Format as a percentage.
  • Ctrl+Shift+6 (Windows/Chrome OS/macOS): Format as an exponent.
  • Ctrl+\ (Windows/Chrome OS) or Cmd+\ (macOS): Clear all formatting from the selected cells.

Move Around a Spreadsheet

You can move around your spreadsheet quickly without touching your mouse! With these helpful shortcuts, you can zip between rows and columns:
  • Left/Right/Up/Down Arrow: Move one cell to the left, right, up, or down.
  • Ctrl+Left/Right Arrow (Windows/Chrome OS) or Ctrl+Option+Left/Right Arrow (macOS): Move to the first or last cell with data in a row.
  • Ctrl+Up/Down Arrow (Windows/Chrome OS) or Ctrl+Option+Up/Down Arrow (macOS): Move to the first or last cell with data in a column.
  • Home (Windows), Search+Left Arrow (Chrome OS), or Fn+Left Arrow (macOS): Move to the beginning of a row.
  • End (Windows), Search+Right Arrow (Chrome OS), or Fn+Right Arrow (macOS): Move to the end of a row.
  • Ctrl+Home (Windows), Ctrl+Search+Left Arrow (Chrome OS), or Cmd+Fn+Left Arrow (macOS): Move to the beginning of the sheet (A1).
  • Ctrl+End (Windows), Ctrl+Search+Right Arrow (Chrome OS), or Cmd+Fn+Right Arrow (macOS): Move to the end of the sheet.
  • Ctrl+Backspace (Windows/Chrome OS) or Cmd+Backspace (macOS): Scroll back to the active cell.
  • Alt+Down/Up Arrow (Windows/Chrome OS) or Option+Down/Up Arrow (macOS): If you have more than one sheet in the current file, use this shortcut to move to the next or previous sheet.
  • Alt+Shift+K (Windows/Chrome OS) or Option+Shift+K (macOS): Display a list of all sheets.
  • Ctrl+Alt+Shift+M (Windows/Chrome OS) or Ctrl+Cmd+Shift+M (macOS): Move focus out of the spreadsheet.

Use Formulas

These shortcuts come in handy when you type formulas in your spreadsheet:
  • Ctrl+~: Show all formulas in the sheet.
  • Ctrl+Shift+Enter (Windows/Chrome OS) or Cmd+Shift+Enter (macOS): Insert an array formula (when you input a formula, type “=” first).
  • F1 (Windows) or Fn+F1 (macOS): Full or compact formula help (when you type a formula).
  • F9 (Windows) or Fn+F9 (macOS): Toggle formula result previews (when you type a formula).

Add or Change Rows and Columns on a PC

If you want to duplicate a cell’s data into a selected range, hide or delete columns or rows, follow the shortcuts below.
Because Google likes to make things complicated, there are some browser-specific commands for these keyboard shortcuts if you use Chrome. If you are, just follow the commands, and then add the “Chrome” shortcut to complete the browser-specific commands:
  • Ctrl+D: Duplicate the data from the first column of the selected range down.
  • Ctrl+R: Duplicate the data from the first row of the selected range to the right.
  • Ctrl+Enter: Duplicate the data from the first cell of the selected range into the other cells.
  • Ctrl+Alt+9: Hide rows.
  • Ctrl+Shift+9: Unhide rows.
  • Ctrl+Alt+0: Hide columns.
  • Ctrl+Shift+0: Unhide columns.
  • Alt+I, then R (Chrome) or Alt+Shift+I, then R (Other browsers): Insert rows above.
  • Alt+I, then W (Chrome) or Alt+Shift+I, then W (Other browsers): Insert rows below.
  • Alt+I, then C (Chrome) or Alt+Shift+I, then C (Other browsers): Insert columns to the left.
  • Alt+I, then O (Chrome) or Alt+Shift+I, then O (Other browsers): Insert columns to the right.
  • Alt+E, then D (Chrome) or Alt+Shift+E, then D (Other browsers): Delete rows.
  • Alt+E, then E (Chrome) or Alt+Shift+E, then E (Other browsers): Delete columns.

Add or Change Rows and Columns on macOS

If you use a Mac, follow these shortcuts to add, remove, or change rows and columns in Google Sheets:
  • Cmd+D: Duplicate the data from the first column of the selected range down.
  • Cmd+R: Duplicate the data from the first row of selected range to the right.
  • Cmd+Enter: Duplicate the data from the first cell of the selected range into the other cells.
  • Cmd+Option+9: Hide a row.
  • Cmd+Shift+9: Unhide a row.
  • Cmd+Option+0: Hide a column.
  • Cmd+Shift+0: Unhide a column.
  • Ctrl+Option+I, then R: Insert rows above.
  • Ctrl+Option+I, then W: Insert rows below.
  • Ctrl+Option+I, then C: Insert columns to the left.
  • Ctrl+Option+I, then O: Insert columns to the right.
  • Ctrl+Option+E, then D: Delete rows.
  • Ctrl+Option+E, then E: Delete columns.

Access the Menus on a PC

You can use the following shortcuts on a PC to access each menu item. Note that most are slightly different in Chrome:
  • Alt+F (Chrome) or Alt+Shift+F (Other browsers): Access the File menu.
  • Alt+E (Chrome) or Alt+Shift+E (Other browsers): Access the Edit menu.
  • Alt+V (Chrome) or Alt+Shift+V (Other browsers): Access the View menu.
  • Alt+I (Chrome) or Alt+Shift+I (Other browsers): Access the Insert menu.
  • Alt+O (Chrome) or Alt+Shift+O (Other browsers): Access the Format menu.
  • Alt+T (Chrome) or Alt+Shift+T (Other browsers): Access the Tools menu.
  • Alt+H (Chrome) or Alt+Shift+H (Other browsers): Access the Help menu.
  • Alt+A (Chrome) or Alt+Shift+A (Other browsers): Access the Accessibility menu (present when screen reader support is enabled).
  • Shift+Right-click: Show your browser’s context menu (by default, Google Sheets overrides your browser’s context menu with its own).
  • Ctrl+Shift+F: Switch to Compact mode (hide the menus).

Access the Menus on macOS

You can use the following shortcuts on a Mac to access each menu item:
  • Ctrl+Option+F: Open the File menu.
  • Ctrl+Option+E: Open the Edit menu.
  • Ctrl+Option+V: Open the View menu.
  • Ctrl+Option+I: Open the Insert menu.
  • Ctrl+Option+O: Open the Format menu.
  • Ctrl+Option+T: Open the Tools menu.
  • Ctrl+Option+H: Open the Help menu.
  • Ctrl+Option+A: Open the Accessibility menu (present when screen reader support is enabled).
  • Cmd+Option+Shift+K: Open the Input Tools menu (available in all documents that contain non-Latin languages).
  • Cmd+Shift+F: Switch to Compact mode (hide the menus).
  • Shift+Right-click: Show the browser’s context menu (by default, Google Sheets overrides your browser’s context menu with its own).

Access Microsoft Excel Keyboard Shortcuts

Example of Google Sheets compatible shortcuts.
Google

As of May 2019, Google allows you to use familiar keyboard shortcuts from other well-known spreadsheet programs. You do have to enable this option, but here’s how:
From your Google Sheets spreadsheet, click Help > Keyboard shortcuts. Alternatively, press Ctrl+/ (Windows/Chrome OS) or Cmd+/ (macOS).
Click Help, and then select Keyboard shortcuts.
At the bottom of the window, toggle-on “Enable compatible spreadsheet shortcuts.”
Click the toggle next to "Enable compatible spreadsheet keyboard shortcuts" to on.
That’s all there is to it! All the shortcuts you’ve learned are now available in Google Sheets. To see a complete list, click “View compatible shortcuts” next to the toggle switch.
Click "View compatible shortcuts."

Hopefully, all these shortcuts will make your work a lot easier! If you didn’t find the one you need, head over to the Google support page for more.


All the Best Google Sheets Keyboard Shortcuts.html
Displaying All the Best Google Sheets Keyboard Shortcuts.html.